Design it Yourself Sweater Project | Step 4
Swatching to choose yarn and needle combination, stitch patterns and gauge.

– 4 min read
Swatching to choose yarn and needle combination, stitch patterns and gauge.

There was a lot of analytical thinking involved in sketching my sweater draft to scale and checking the math, so I've been looking forward to a more tactile experience with my yarn and needles.
I've decided to knit my sweater in a yarn that I'm already familiar with, but I'm not exactly sure which one. The three candidates that initially popped into my head were:
After digging through my stash of leftover bits, I decided to skip swatching with the Madrona. It's a little fluffier than I want for an everyday sweater. But I found a great alternative:
I'm knitting swatches so I can make informed decisions about my design. Yes, the gauge is an important piece of information that I'll need to finish off the last bit of math before knitting my sweater. However, I'm also using the swatching experience to choose the yarn, pair the yarn with the appropriate needle, and practice the stitch patterns I will use for my sweater. Just like the math I've already done, swatching is an iterative process.
A couple pro tips for swatching:

My first three swatches were knit in plain stockinette stitch. Since I've used all of these yarns before, I already had a good idea about which needle size/material to pair with each yarn to create my desired fabric drape and density. At this point I'm leaning towards the Rylie and Twisp yarns.
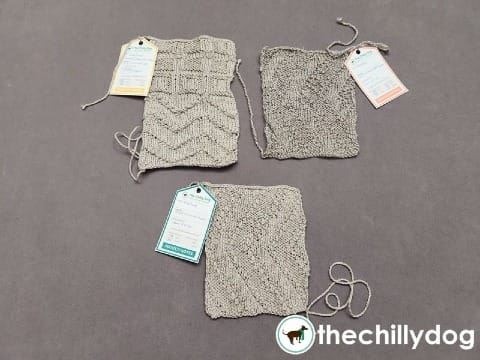
I want my sweater to have a subtle stitch pattern. I play around with some chevrons, squares, and the angular pattern I originally used in my mobius shawl. Even though the angular pattern worked great for a shawl, it's a little too much for a sweater. Also, after re-measuring my much-worn mobius, I discover the dimensions are not what they used to be and I rule out the the Rylie yarn.
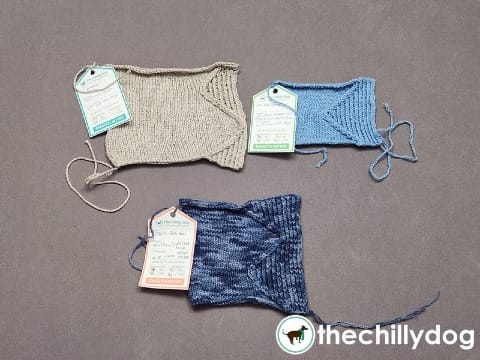
Instead of choosing an all-over stitch pattern I consider using stitch-work as a decorative accent and "button band" up the front of my cardigan and maybe at the center of the back. I settle on part of a stitch pattern from the "Japanese Knitting Stitch Bible" and practice it with the Twisp and CoBaSi.
I was having a tough time deciding between the yarns until I blocked the fabrics and realized one took much longer to dry. CoBaSi can be machine washed and dried. The Twisp is a handwash, air dry yarn. With a good drying rack and airflow, the Twisp dries quickly enough. However, I'm planning to wear my sweater during an extended trip this summer and I won't have my drying rack or more that 12 hours (overnight) in any one place to let a sweater dry. My decision is made.
HiKoo CoBaSi yarn, 3.5 mm addiClick Turbo needles, and a twisted rib zig-zag stitch pattern.
For whatever reason, before blocking my final swatch, I measured the actual dimensions of my 49 row swatch (not counting the cast on or bind off rows), not just the gauge, and I'm glad I did.
After blocking, the stitch gauge changed very slightly. The row gauge jumped from 39 rows/4 inches to 44 rows/4 inches. I remeasured multiple times just to make sure I wasn't imagining things.
Then I realized I could confirm what I was seeing by comparing my measured swatch sizes (5 inches before blocking 4.5 inches after) with the calculated swatch sizes based on my gauge.
number of rows ÷ gauge (rows/inch) = length
Before blocking, 49 rows ÷ 39 rows/4 inches = 5.03 inches. Which is essentially what I measured.
After blocking, 49 rows ÷ 44 rows/4 inches = 4.45 inches. Again, essentially what I measured.
I didn't need to do that check, but it makes me feel more confident that my final gauge was correct. That's important because I'll be using gauge to estimate my yarn usage and to figure out my sweater's shaping increases and decreases.
Yarn and needle support provided by