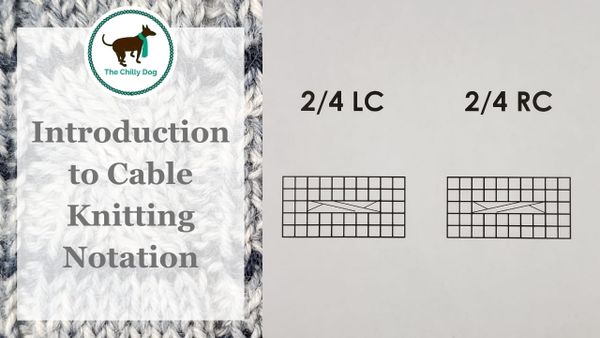
5 Tips for Knitting Cables

Many experienced knitters consider knitting cables as a quintessential skill. However, many new knitters are intimidated by the intricate twists and turns that cabling creates. Put those worries aside because today I'm going to unravel the myth that cables are scary.
Knitting cables isn't nearly as tricky as most people imagine. To create a cable, you are simply changing the order that a group of stitches is knit. For example, instead of knitting stitches in order 1, 2, 3, 4, you could rearrange them on your needles and work them 3, 4, 1, 2.
- Tip 1 - Always use a cable needle that is the same size or smaller than your stitches so you don't stretch them out.
- Tip 2 - Always slip stitches purlwise onto your cable needle so they stay properly mounted.
- Tip 3 - When you want your cable to lean to the RIGHT, the stitches slipped onto your cable needle will be held at the REAR (or back) of your work.
- Tip 4 - When you want your cable to lean to the LEFT, the stitches slipped onto your cable needle will be held at the LEAD (or front) of your work.
- Tip 5 - Before using a stitch chart that includes multiple types of cables, use colored highlighters to match the cabled stitches in the chart to the key. It makes it much easier to keep track of your stitches as you work.
Lesson Notes
- Introduction - 0:00
- Cabling Tips - 2:59
- Final Notes - 5:34
Pattern: Birch Grove Socks
Yarn: Schoppel Boots
Needles: skacel by addi FlexiFlips and FlipStix
Notions: Clover Cable Stitch Holders, Boye Metal Cable Needle

There's more to explore in the Learning Library!