Search the site

It's Knot OK!

It's Knot OK!

There's a reason why knitting is better with friends. Besides the great conversations and comradery, there's usually someone in the group that can help when you have a problem (knitting or otherwise). At the very least, the group can brainstorm possible solutions.

This week at our coffee and knitting group I was the fixer of a pair of similar problems that seemed big in the moment, but only took a few minutes of patience and less than a yard of yarn each to fix.

Both problems were related to knots. Don't you just hate when you are knitting along and find a knot in your yarn! It's almost always best to cut out the knot, and re-join the yarn ends with something more secure like a Russian join, or even a spit join. Unfortunately neither knitter had done that. They just knit on. And that's where the problems began.

The first knitter had finished her sweater thinking the knot would be just fine. Then she blocked it and guess what. The knot came undone creating a hole. Ugh! The second knitter was still working on her sweater and didn't want to suffer the same fate, but also didn't want to rip out dozens of rounds of stitches.

Duplicate Stitch to the Rescue

I didn't get pictures of fixing the hole in the first knitter's sweater, but I did get pictures of taking out the knot before it could create a hole in the second knitter's sweater, so here we go.

On your mark...

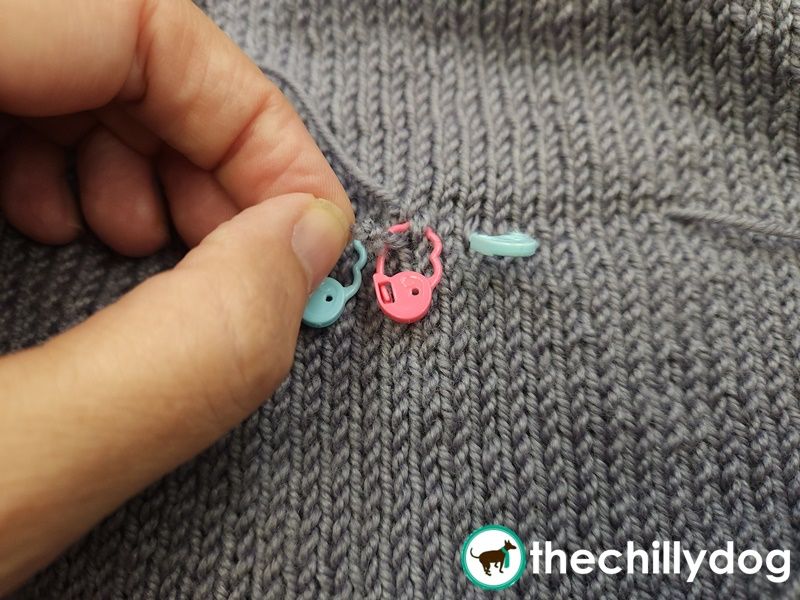
I think it's easiest to duplicate stitch on the right side of stockinette stitch. I marked the stitch with the knotted yarn (pink) and stitches on each side of the knot (blue). That helps me make sure I duplicate stitch across the right row.

I started with 3 locking stitch markers. The pink marker in the middle is clipped around the stitch with the pesky knot. The blue markers on each side are in the same row, a couple stitches away from the offending knot.

Get Set...

After the knotty stitch and row were marked, I was able to duplicate stitch across the row, and stopped at the knot. As you can see below, I worked duplicate stitch for a couple inches and it adds a little bulk which will be removed in just a minute.

I traced the path of the yarn across the row for about 2 inches until I reached the naughty knot.

Go Away...

A little snip and the knot is gone. This is the point when I removed the center locking marker too. Then poke the snipped yarn tails through to the wrong side.

Yep! I took a pair of scissors to another knitter's work and she didn't even freak out.
The knotty tails get poked through to the wrong side and will be unraveled in just a moment.

After the yarn was snipped I continued doing the duplicate stitch for a couple inches on the right side of the sweater.

Finally the bulk across the row of "double" stitches can be minimized by unraveling a few stitches of the old, knotty yarn.

After the duplicate stitch was done with the new yarn, I unraveled the old yarn. On each side there's one stitch that's worked with both yarns.

I left the yarn tails out for my friend to weave in on the wrong side now that the knot is gone.

On the right side, you can't even see the surgery, so I set a pair of markers on the fabric on either side of the repair.

The right side after the knot-ectomy has been completed.

The whole process took less than 10 minutes and I was stopping to take pictures along the way. It's worth the time to prevent problems later on.

Next time however, I hope both knitters (and you too!) remember to take care of knots instead of ignoring them and hoping for the best.


There's more to explore in the Learning Library!